A number of colleges and schools have plotters for student use. These include the College of Natural Sciences and UT Document Solutions. The Office of Undergraduate Research handles poster printing for select on-campus events, such as the Longhorn Research Poster Session. There may be restrictions on the use of plotters, so you may also need to explore off-campus options such as copy centers. Please contact each site directly well in advance of the time you need to print.
Transferring between computers
If you design your poster on a Mac and transfer it to a PC for printing, or vice versa, you may experience unexpected changes in the layout or fonts.
To be absolutely safe from last-minute formatting trouble, convert your poster file into PDF format before transferring it to the computer from which you will print. You can do this by going to File > Print and selecting “Print to PDF” or “Save as PDF.”
Saving to PDF on a Mac will ensure that any special fonts you’ve used will be embedded in the resulting file, meaning that they should show up as intended when the file is opened and printed on another computer. To do this in Windows, be sure to check the “embed fonts” option when you convert to PDF.
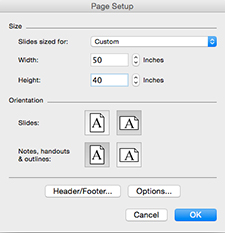
Page Setup
 |
Change the page size to match the final print size. To change the page size in Microsoft PowerPoint, go to “File” and select “Page Setup.” The event where you are presenting may specify poster dimensions, but generally poster dimensions are 46” – 50” × 40”. |
Image Resolution
![]() An image might look pixelated if you increase its size for use on your poster. To avoid this, only use large, high-resolution images (above 300 ppi). Make sure your images do not look pixelated before you print.
An image might look pixelated if you increase its size for use on your poster. To avoid this, only use large, high-resolution images (above 300 ppi). Make sure your images do not look pixelated before you print.
Troubleshooting
Are the solutions listed here not solving your problem? Please contact the Office of Undergraduate Research for additional help or to let us know how you solved a poster printing problem.
After printing, you’re almost ready. Make sure you know what you’ll need to present.

